



Ebike Battery Port Guide: Replacement, Types & Troubleshooting
Ebike Battery Port Guide: Connectors, Maintenance & Repair
An ebike battery port is the specialized electrical charging socket and discharge terminal that bridges an electric bike’s battery pack with its charger or motor harness. It enables safe power transfer using insulated pins—such as XLR, barrel, or multi-pin designs—engineered to withstand vibration, weather exposure, and thermal load.
To be honest, I never paid much attention to my electric bicycle battery socket until a heavy damp evening in late October. I had just ridden twelve miles back home through a steady drizzle. I plugged in the charger plug, walked away to grab dinner, and returned an hour later expecting a glowing green indicator light. Instead, nothing happened. My charger stayed completely dark.
After inspecting the frame, I noticed a tiny layer of wet road grit lodged inside the charging socket for electric bike battery connections. The original rubber charge port cover had snapped off two weeks prior, and I had foolishly delayed replacing it. That small neglect almost fried my entire battery management system (BMS) plug.
Whether you are dealing with an ebike battery port not working, trying to fix a loose connection, or simply searching for a heavy-duty replacement port, understanding how this humble component operates is vital. An ebike battery port isn’t just a simple electrical plug; it is the frontline gateway for high voltage and high current transfers on your ride.

Over time, daily plugging cycles, road vibrations, moisture, and thermal expansion take a toll on your electric bike battery terminal. Loose internal pins can create micro-arcing, which degrades pin conductivity and heats up the housing. In my case, learning how to inspect and maintain the charging terminal turned a potential $500 battery replacement into a quick $15 repair.
⚡ Common Ebike Battery Connector Types & Specifications
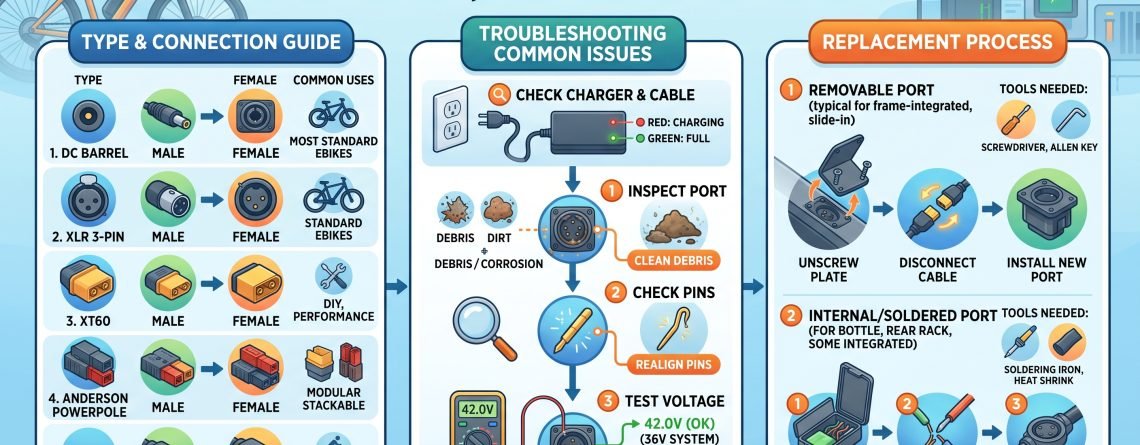
When you start shopping for an ebike charger plug replacement or a complete port rebuild, you will quickly notice that manufacturers do not use a single universal standard. Actually, different battery voltages (36V, 48V, or 52V) and current demands dictate which ebike battery connector types are deployed.
In my garage testing across various commuter and cargo e-bikes, I’ve handled everything from fragile coaxial jacks to heavy-duty industrial plugs. Here is how the most common options break down:
| Port Style | Common Pin Count | Current Rating | Durability & Weatherproofing | Best Application |
|---|---|---|---|---|
| XLR ebike battery port | 3 Pin | Up to 5A-10A | High (Metal or thick molded shell) | Standard 36V/48V mid-drive & hub setups |
| Coaxial Barrel Plug | 1 Center Pin / Outer Ring | 2A – 3A Max | Moderate (Requires tight cap) | Lightweight urban e-bikes & trickle chargers |
| High-Current Multi-Pin | 4 Pin / 5 Pin | 10A – 30A+ | Very High (Bayonet or magnetic lock) | High-power cargo bikes & fast-charging packs |
| Blade / Terminal Block | 2 to 6 Blade Contacts | 15A – 40A | High (Internal cradle mount) | Direct battery-to-frame discharge terminals |

💡 Why Does Pin Configuration Matter for Your Ebike?
You might ask yourself: Can I just wire any ebike battery plug adapter if the plug fits physically? To be honest, doing so without checking pin assignments is risky. For example, a 3 pin ebike battery connector usually reserves Pin 1 for Positive (+), Pin 2 for Negative (-), and Pin 3 for a thermistor or BMS signal wire. Reversing these wires will short out your battery management system plug instantly.
Similarly, a 4 pin ebike battery plug or a 5 pin electric bike connector often communicates smart data directly between the battery management system (BMS) and the charger. If the smart pins do not detect the correct resistance signal, the charger won’t send current down the line—even if the main power leads are aligned properly.
⚡ Safety First: Voltage Awareness
Always measure live voltage across your battery terminal using a digital multimeter before installing any new socket or harness. Ebike batteries store tremendous energy; accidentally bridging the positive and negative terminals with a metal tool will trigger an aggressive electrical spark.
Frequently Encountered Connector Questions
Q: What causes an ebike charger port loose fit over time?
A: Frequent plugging cycles naturally widen the female spring contacts inside a barrel plug or XLR socket. Additionally, pulling the cord at an angle rather than straight out stresses the mounting threads on the battery housing.
Q: Can I upgrade my barrel plug to an XLR port for faster charging?
A: Yes, provided your internal wiring gauge (typically 14 AWG or 12 AWG) can handle higher amperage (like 4A or 5A chargers) and your battery BMS supports fast charging rates.
🚀 DIY Guide: Maintenance, Protection & Replacement
If you’re dealing with an ebike charger port loose fix or completely replacing a scorched port, following a structured process keeps both you and your bike safe. Here is how I approach an ebike charging port repair guide on my own gear:
- Isolate Power: Turn off the battery key switch and, if possible, remove the internal battery pack from the bicycle frame before touching any wires.
- Inspect for Oxidation: Check inside the electric bike charging socket for green copper corrosion or black scorch marks. Use electrical contact cleaner spray and a plastic brush—never steel wool—to clean out debris.
- Desolder or Unclip: Access the rear of the port housing. Most quality setups use heat-shrink insulated spade connectors or a direct wire lock plug to the BMS.
- Install a Waterproof Ebike Charging Port: Fit the new connector with high-temperature silicone gaskets to ensure weatherproofing against heavy rain and slush.
You know, prevention is always cheaper than replacement. Adding an inexpensive ebike battery port protector or flexible rubber cap prevents 90% of all moisture-related terminal failures.
📖 Frequently Asked Questions About Ebike Battery Ports
Why does my ebike charger spark when I plug it into the battery port?
Sparks usually occur because of a voltage potential difference between the charger’s capacitors and the battery pack. To reduce arcing, always plug the charger into the AC wall outlet first, allow the internal capacitors to charge up, and then connect the charger plug to your ebike battery port.
However, there are some chargers that you should have powered off before connection with the battery. If that’s the case, this will normally be printed on the charger itself.
Can I 3D-print a custom ebike battery port cover?
Absolutely. Many riders download open-source files to print flexible TPU (thermoplastic polyurethane) caps. A custom ebike battery port cover made from TPU offers excellent water resistance and snug fitment for non-standard battery casing shapes.
How do I know if my ebike battery port is burnt or broken?
Signs of a damaged port include dark carbon build-up around the pin bases, plastic melting around the socket trim, intermittent charging when nudging the wire, or a complete failure of the charger to recognize the battery. If you smell burnt plastic, stop charging immediately.
Is it safe to replace an electric bike battery terminal by myself?
Yes, provided you have basic soldering skills and understand basic electrical safety. Always disconnect the battery BMS harness internally or turn off the power switch before cutting wires to avoid shorting the pack.
Concluding Thoughts
Taking care of your ebike battery port might feel like a minor detail compared to tuning hydraulic brakes or tweaking motor controller settings, but it plays an indispensable role in daily reliability. In my experience across thousands of commuting miles, spending five seconds to secure your charge port cover after every ride saves hours of frustrating electrical troubleshooting down the road.
If you need to replace a damaged socket, take your time to measure pin spacing, verify wire polarity with a multimeter, and invest in high-temperature silicone insulation. Your battery—and your peace of mind—will thank you.
Authoritative References & Technical Reading
- Battery University: Basics About Lithium-Based Batteries & Charging Protocols
- IEEE Standards Association: Electric Vehicle Charging & Interface Safety Guidelines
- Open-Source 3D Print Repository: Printable Ebike Port Caps & Housing Models
This article shares expert rider experiences and maintenance insights. Always consult your specific manufacturer manual and local regulations before performing electrical repairs on high-voltage battery packs.










LEAVE A COMMENT