





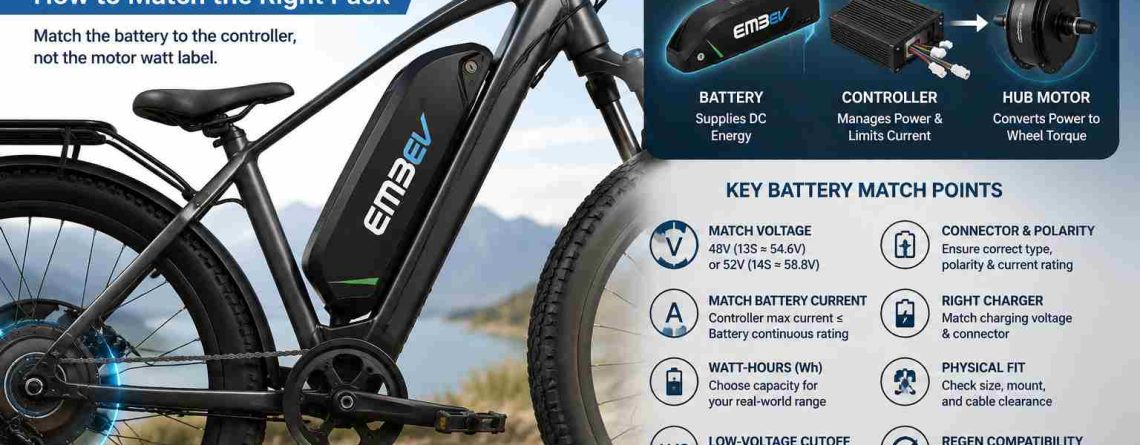
eBike Battery for Hub Motor: How to Match the Right Pack
An eBike battery for hub motor use should be matched mainly to the motor controller, not chosen from the motor’s watt label alone. Check controller voltage, maximum battery current, battery BMS output, watt-hours, low-voltage cutoff, connectors, charger, and physical fit before selecting a 48V or 52V pack.
Quick Answer
- Start with the controller’s supported battery voltage.
- Make sure its maximum battery current does not exceed the battery’s continuous discharge capability.
- Use watt-hours (Wh) to choose range after electrical compatibility is confirmed.
- Check full-charge voltage, low-voltage cutoff, connector polarity, wiring, mount, and charger.
- Do not choose a battery only because the hub motor is labeled with a certain watt rating.
Choosing a battery for a hub-motor eBike can look simple. You find the watt number on the motor, buy a battery that sounds powerful enough, and connect the two.
That approach misses the most important component between them: the controller.
The battery supplies DC energy to the controller. The controller decides how much battery current it draws and how it sends power to the hub motor. For that reason, the controller’s electrical limits are usually the best starting point when matching a replacement or upgrade battery.

What Actually Determines Hub Motor Battery Compatibility?
The battery, controller, and hub motor work as one electrical system, but the controller provides the most useful battery-side voltage and current limits.
A typical hub-drive system has three main power components:
- Battery: stores energy and supplies DC voltage and current.
- Controller: limits battery current and controls the current delivered to the motor.
- Hub motor: converts electrical energy into wheel torque and motion.
This explains why a motor label such as 500W, 750W, or 1000W does not give enough information to select a battery by itself.
Two systems can use motors with similar nominal watt ratings but different controller current limits. Those controllers can place very different demands on the battery.
When available, read the controller label or documentation first. Look for supported voltage, maximum battery current, and low-voltage cutoff.
Step 1: Match Battery Voltage to the Controller
The controller must support the battery’s complete operating voltage range, including its voltage immediately after a full charge.
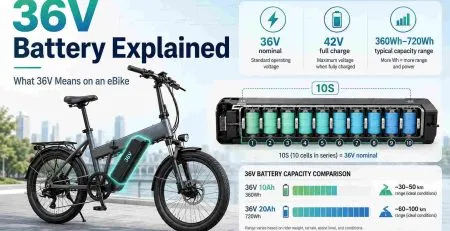
For common lithium-ion eBike systems, a nominal 48V battery is usually a 13-series pack and reaches about 54.6V when fully charged. A typical 52V battery is 14S and reaches about 58.8V.
Do not look only for the words “48V” or “52V” on one component. Check whether the controller is actually designed to accept the full-charge voltage of the proposed pack.
| Battery system | Typical configuration | Approx. full-charge voltage | Compatibility check |
|---|---|---|---|
| 48V lithium-ion | 13S | 54.6V | Controller must support a 48V/13S battery |
| 52V lithium-ion | 14S | 58.8V | Controller and related electronics must support 52V/14S |
If an existing hub-motor bike already uses 48V, staying with a compatible 48V battery is normally the simpler replacement path.
A change to 52V should not be treated as a battery-only upgrade. The controller, display, lighting circuits, charger, and other voltage-sensitive electronics may also need to support the higher full-charge voltage.
If your main question is whether 48V or 52V gives better performance, use the dedicated voltage-comparison article rather than this hub-motor compatibility guide.
Step 2: Match Controller Battery Current to the BMS
The controller’s maximum battery current should stay within the battery pack’s continuous discharge capability.
This is one of the most important checks in a hub-motor battery setup.
The controller draws DC current from the battery. That current passes through the battery cells, BMS, discharge wiring, connector, and controller input.
If the controller is allowed to request more battery current than the pack is designed to supply continuously, several problems can occur. Voltage can sag more strongly, wiring and connectors can heat, or the BMS may enter overcurrent protection and shut the battery off.
Controller maximum battery current ≤ battery continuous discharge rating
Use the battery manufacturer’s continuous rating for this check. A short-duration peak figure should not be treated as the normal operating target.
Battery current is not the same as motor phase current
This distinction is especially useful when working with hub motors.
The current drawn from the battery is called battery or DC current. The controller can also send much higher phase current through the motor windings, particularly at low motor speed.
Phase current is closely related to motor torque and heating. Battery current determines how heavily the battery, BMS, main connector, and battery wiring are loaded.
So if you see a high phase-current figure in a controller specification, do not automatically require a battery with that same discharge-current rating. Find the controller’s maximum battery current instead.
Step 3: Use Watt-Hours to Choose Capacity
After voltage and current compatibility are confirmed, use watt-hours to decide how much stored energy you need for range.
Battery capacity is often advertised in amp-hours, but Ah cannot be compared properly without considering voltage.
A more useful figure is watt-hours:
Battery energy (Wh) ≈ nominal voltage (V) × capacity (Ah)
More Wh means more stored energy, but it does not create a guaranteed number of miles.
Hub-motor energy use changes with speed, wheel size, total weight, terrain, tire pressure, wind, acceleration, motor efficiency, assist level, and temperature.
Instead of selecting capacity from one universal range claim, record how much energy your current setup uses on representative rides. Then leave enough reserve for harder conditions or route changes.
A larger battery can provide more energy, but it can also increase weight and require a larger case. Make sure the extra capacity still fits the bike securely.
Step 4: Check LVC, Connectors, Wiring, and Charger
A correct voltage and current match can still fail if the low-voltage cutoff, connector, wiring, or charger is incompatible.
The controller’s low-voltage cutoff should be appropriate for the battery system. If it is configured for a different voltage range, the bike may shut down too early or operate outside the intended system settings.
Next, inspect the battery-to-controller connection. Check:
- Connector type
- Polarity
- Current capability
- Cable condition
- Mounting security
A connector that physically fits is not proof of compatibility. Different wiring arrangements can use similar-looking housings.
The charger must also match the battery itself. A typical 48V/13S lithium-ion battery uses a 54.6V charger, while a 52V/14S battery uses a 58.8V charger.
Do not use a charger simply because the charging plug fits. U.S. consumer-safety guidance warns that so-called universal chargers can still be electrically incompatible with a micromobility battery.
Does Front or Rear Hub Location Change Battery Requirements?
Front versus rear motor position does not by itself determine battery voltage, Wh, or BMS rating; the electrical controller requirements remain the key battery-side limits.
If two hub-motor systems use the same controller voltage and battery-current limits, moving the motor from the front wheel to the rear wheel does not automatically require a different battery.
Motor position can affect installation, traction, handling, axle loads, and wiring layout, but those are separate motor and conversion decisions.
This page therefore does not use front-versus-rear location as a battery-sizing rule.
What If the Hub Motor System Uses Regenerative Braking?
If regenerative braking is enabled, the battery system must also be able to accept the charging current and voltage produced during regeneration.
Regenerative braking changes the direction of energy flow. During normal riding, energy moves from the battery through the controller to the motor. During regeneration, some electrical energy can move back toward the battery.
If your controller supports this feature, check its maximum regenerative battery current and regenerative voltage settings. They must stay within the charging limits of the battery and BMS.
Regeneration can also be restricted when the battery is already near full charge because there is less voltage headroom for incoming energy.
Do not assume every hub-motor system supports regenerative braking. Treat it as a system-specific function rather than a standard battery feature.
Hub Motor Battery Compatibility Checklist
Verify the complete battery-to-controller power path before ordering a replacement pack.
| Specification | Where to check | What must match |
|---|---|---|
| Nominal voltage | Battery and controller | Controller supports the battery system voltage |
| Full-charge voltage | Battery specification | Below the controller’s supported maximum input |
| Maximum battery current | Controller | Within battery continuous discharge capability |
| BMS output | Battery specification | Supports normal controller battery-current demand |
| Watt-hours | Battery | Enough stored energy for the intended route |
| Low-voltage cutoff | Controller/display | Appropriate for the battery system |
| Connector and polarity | Battery/controller wiring | Electrically and physically compatible |
| Charger | Battery specification | Correct charging voltage and connector |
| Regen limits | Controller and battery | Compatible when regeneration is enabled |
A Practical Way to Validate a Hub Motor Battery
Use the labels and specifications from your actual bike rather than estimating battery requirements from the hub motor name alone.
Start by photographing the controller label, existing battery label, charger label, and battery connectors.
Record the controller’s supported voltage and maximum battery current. Then compare those numbers with the proposed battery’s nominal voltage, full-charge voltage, and continuous discharge rating.
Next, measure the battery mounting space. Check case length, width, height, mounting points, cable routing, connector clearance, and battery removal direction.
Finally, check the normal ride. Consider your usual distance, hills, total load, speed, assist level, and remaining battery energy at the end of the route.
This process separates three different questions:
- Will it work electrically? Voltage, current, BMS, LVC, connector.
- Will it fit physically? Case, mount, cable and removal clearance.
- Will it provide enough energy? Watt-hours and real riding demand.
If one of those questions cannot be answered from the available specifications, confirm it before connecting the new battery.

48V and 52V Battery Options for Compatible Hub Motor Systems
Choose the battery category that matches the existing controller voltage rather than treating 52V as an automatic upgrade from 48V.
48V eBike Batteries
For compatible 48V/13S hub-motor systems. Compare watt-hours, continuous discharge capability, BMS specification, case size, and connector requirements
52V eBike Batteries
For systems that explicitly support 52V/14S operation. Confirm controller voltage limits, BMS requirements, and the correct charger first.
If your real question is how much battery a specific 750W system requires, see the dedicated 750W eBike battery guide. If you are deciding between motor architectures, use the hub drive vs mid drive guide.
This page remains focused on matching a battery to an existing hub-motor electrical system.
Frequently Asked Questions
What battery do I need for an eBike hub motor?
Start with the controller. Match its supported voltage to the battery, then make sure the controller’s maximum battery current stays within the battery’s continuous discharge capability. After that, choose enough Wh for your range and confirm connectors, LVC, charger, and physical fit.
Can I use a 48V battery with a hub motor?
Yes, when the controller and complete system are designed for a compatible 48V/13S battery. A typical 48V lithium-ion pack reaches about 54.6V when fully charged.
Can I use a 52V battery with a hub motor?
Yes, but only when the controller and other voltage-sensitive electronics support 52V/14S and its approximately 58.8V full-charge voltage. Do not assume a 48V system automatically supports it.
Does a bigger hub motor need a higher-Ah battery?
Not necessarily. Ah mainly describes capacity. Current capability should be checked against controller battery current, while range is better compared in Wh. Motor size alone does not determine the required Ah.
Should BMS amps match the hub motor watt rating?
No. Match BMS continuous discharge capability to the controller’s battery-current demand and the battery-cell capability. Motor watts and battery amps measure different parts of the electrical system.
Does a rear hub motor need a different battery from a front hub motor?
Not simply because of motor position. If the two systems have the same voltage and controller battery-current requirements, the basic battery electrical requirements can be similar.
Can an undersized battery cause an eBike to cut out under load?
It can. Excessive current demand may increase voltage sag or trigger BMS protection. However, cutouts can also come from connectors, wiring, controller limits, battery condition, temperature, or other faults, so diagnose the complete system before replacing the battery.
Final Answer
The best eBike battery for hub motor use is the battery that matches the controller’s real electrical limits.
Confirm controller voltage first. Then compare maximum battery current with the pack’s continuous discharge capability and BMS rating. After those checks pass, choose enough watt-hours for your riding distance.
Finish by checking low-voltage cutoff, connector and polarity, wiring, charger, mounting space, and regenerative-braking limits if your system uses regen.
Do not size the battery from motor wattage alone. For hub-drive systems, controller specifications provide the clearest link between the motor system and the battery it needs.



LEAVE A COMMENT